Zendesk Integration with Salesforce
Posted on March 02, 2024
Salesforce Zendesk Integration
It’s now a common trend that organizations using multiple CRM’s for various departments. Why does an organization have to do something like that? It depends on lots of aspects like to keep expenses under control, leverage the technological advantage that each products provide, having the competitive edge to meet customer needs faster, etc.
Therefore, it is not a blunder to choose multiple products, in fact CRM, for various needs. For example, we have seen organizations who leverage Salesforce for core Sales and Zendesk for Service even though Salesforce provides their flagship Service Cloud. Clearly, there is a cost advantage in choosing Zendesk for Service because either “Suite Growth” or “Suite Professional” is not that costly as Salesforce Service Cloud “Service Professional” or “Enterprise” options. At the same time, Zendesk for Service offers more in their packages that Salesforce Service Cloud.
So, why wouldn’t organizations choose multiple CRM’s? Makes sense !! We definitely can also debate on the fact that the Salesforce/Zendesk Sales Reps who will offer you discounts and custom pricing to win the deal to stick to their product and all that. On a long term, there is this threat for organizations getting stuck to a single product. So, in a different angle, distributing the risk of dependence is a key decision factor for various organizations. And it’s a good thing when organizations think in this direction.
Allright. Enough of the CRM wars and opinions. Let’s now talk about how to get Zendesk to integrate with Salesforce.
Summary of steps to integrate
- Ensure access to Zendesk and Salesforce
- Adjust Session Settings in Salesforce
- Install & Configure Zendesk for Salesforce AppExchange app in Salesforce
- Enable Ticket View
- Configure Profiles in Salesforce to see Zendesk cases and views
- Configure Object Page Layout to add Zendesk ticket view
- Sync accounts, contacts, leads to Zendesk
Pre-Requisites
- Zendesk to Salesforce Integration is only applicable to Salesforce orgs that are either on Performance, Unlimited, Enterprise, Developer or Professional (with API addon) editions.
- In Salesforce, you should have “My Domain” enabled.
- The System Administrator profile or the integration user profile in Salesforce should have
- System Permissions of “API Enabled” set to ON
- Read, Create, Edit, Delete object permissions on “Push Topics”
- In Salesforce, “Enable Streaming API” should be ON under Setup –> Platform Tools –> User Interface –> User Interface.
1. Ensure access to Zendesk and Salesforce
- First thing is to ensure that you as in charge of integrating these 2 systems have Support Administrator access in Zendesk and System Administrator access in Salesforce.
- API Only User or User with Free Integration License in Salesforce won’t work for this integration.
2. Adjust Session Settings in Salesforce
- Log into Salesforce
- Navigate to Setup –> Settings –> Security –> Session Settings
- Uncheck the box that says “Lock sessions to the IP address from which they originated”
This setting has to be turned off so that the integration connection once established doesn’t get disconnected if the session expires.
3. Install & Configure Zendesk for Salesforce AppExchange app in Salesforce
- Go to Zendesk Admin Center
- In Apps and Integrations –> Integrations –> Integrations, click Connect next to Salesforce integration.
- Click on “Install managed package”
- This will open the “Salesforce Integration for Zendesk” appexchange app.
- Install the app by authorizing against your Salesforce production instance.
- Choose “Install for All Users”
- Click “Install”
- Now return to the Admin Center page where you clicked the “Install managed package” link
- Here, agree to Zendesk terms and click “Connect”
- When it asks for “Allow Access?”, click Allow.
- That’s it, you have connected Salesforce and Zendesk.
3.1 Enable Ticket View
- Come back to Zendesk Admin Center –> Apps and Integrations –> Integrations –> Integrations.
- Next to Salesforce, click Configure.
- In this configuration page, tick mark the option “Enable ticket view”.
- On the Field Matching section, make sure that
- “Find account tickets by” is set to Organization name and “Using Salesforce field” is set to Account Name.
- “Find contact tickets by” is set to Requester Email Address and “Using Salesforce field” is set to Contact Email.
- “Find opportunity tickets by” is set to Ticket Requester’s Organization name and “Using Salesforce field” is set to Account Name.
- “Find lead tickets by” is set to Requester’s Email and “Using Salesforce field” is set to Contact Email.
- Click Save
4. Configure Profiles in Salesforce to see Zendesk cases and views
- Open Salesforce
- Navigate to Setup –> Apps –> Connected Apps –> Manage Connected Apps
- Click on the “Salesforce Integration for Zendesk” app
- Click “Edit Policies”
- Under OAuth Policies, update the “Permitted Users” to “Admin approved users are pre-authorized” and click Save
- Return to Manage Connected Apps page and click “Salesforce Integration for Zendesk” app
- Under Profiles –> Manage Profiles
- Select the user profiles including System Administrator that needs to view Zendesk tickets in Salesforce.
- Click Save.
- To enable Visualforce page access for required profiles, open the visualforce pages from Setup –> Custom Code –> Visualforce Pages (Zendesk_Ticket_View_Contact, Zendesk_Ticket_View_Lead, Zendesk_Ticket_View_Opportunity, Zendesk_Ticket_View_Account”)
- From each of these visualforce page, go to Security –> Action column
- Select all the profiles including System Administrator from “Available Profiles” to “Enabled Profiles” and click on Save.
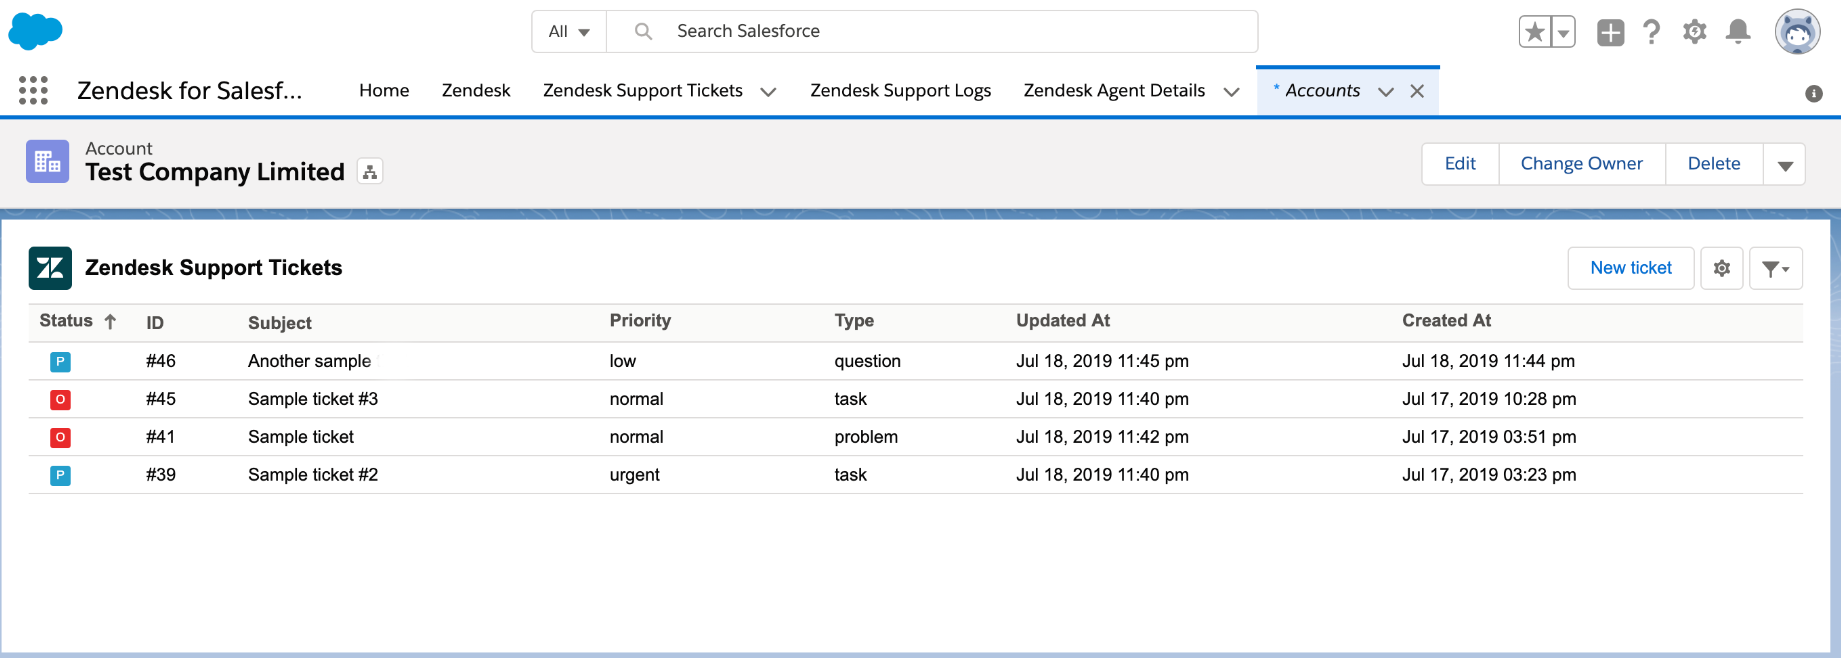
5. Configure Object Page Layout to add Zendesk ticket view
The key salesforce objects from where you would prefer to see associated Zendesk tickets are from Account, Contact, Opportunity, Lead and Case. We will illustrate the steps from an Account perspective. The steps are the same for other objects.
- Click on Accounts Tab in Salesforce
- From the settings cog icon on the upper right, select Edit Page.
- Drag the “Zendesk_Ticket_View” custom managed component on the page.
- If you want to use the Visualforce page, then drag the “Visualforce” page standard component on the page and on thr right sidebar, choose “Zendesk_Ticket_View_Account”
- Click Save
6. Sync accounts, contacts, leads to Zendesk
As your sales team in Salesforce is creating or making updates to accounts, contacts, leads, opportunities or even cases, it is important to sync this information to Zendesk so that Sales and Service are aligned in your organization.
Zendesk for Salesforce Integration supports 1 way sync from Salesforce to Zendesk for the following 2 use-cases.
- Salesforce accounts to Zendesk organizations — Zendesk organizations in Support are automatically created and updated when Salesforce accounts are created or modified.
- Salesforce contacts or leads to Zendesk users — Zendesk users in Support are automatically created and updated when Salesforce contacts or leads are created or modified.
Account Syncing
- In Admin Center, click Apps and integrations in the sidebar, then select Integrations > Integrations.
- In Salesforce, click Configure.
- Click the Data sync side tab, and in Accounts to Organizations sync, click Configure.
- Select the Enable syncing checkbox, and configure the settings for which accounts and account fields are synced to Zendesk.
- You have to set the “Sync Filtering”, “Matching Criteria” and “Field Mappings as per your organizational needs.
- In Synced organization mapping, you can choose to map the Zendesk organization to a Salesforce account. Select any standard or custom Salesforce account field. This one-way sync is useful for displaying a Zendesk user linked to a Salesforce account.
- In Zendesk external ID, select the checkbox if you want the external ID to populate the Zendesk organization external ID field. This can only be set to the Salesforce Account ID.
- Click Save
Contact/Lead Syncing
- In Admin Center, click Apps and integrations in the sidebar, then select Integrations > Integrations.
- In Salesforce, click Configure.
- Click the Data Sync side tab, and in Contacts/Leads to User sync, click Configure.
- Select the Enable syncing checkbox, and configure the settings for which contacts or leads and associated fields are synced to Zendesk.
- In Sync Type, select if you want Zendesk users to be created based on Salesforce contacts or leads. Note that you can only select one.
- You have to set the “Sync Filtering”, “Matching Criteria” and “Field Mappings as per your organizational needs.
- In Synced user mapping, you can choose to map the Zendesk user to a Salesforce contact or lead. Select any standard or custom Salesforce contact or lead field. This one-way sync is useful for displaying a Zendesk user linked to a Salesforce contact or lead.
- In Zendesk external ID, select the checkbox if you want the external ID to populate the Zendesk user external ID field. This can only be set to the Salesforce Contact ID.
- In General options, select the Send welcome email checkbox to send a welcome email to new users in Support.
- Click Save
References
- https://www.zendesk.com/pricing/
- https://support.zendesk.com/hc/en-us/articles/4408821555482-Setting-up-the-Zendesk-for-Salesforce-integration
- https://support.zendesk.com/hc/en-us/articles/4408834115738-Setting-up-Ticket-View-in-Salesforce
- https://support.zendesk.com/hc/en-us/articles/4408828539290-Configuring-data-sync-from-Salesforce-to-Zendesk#topic_sns_fy4_rjb
- https://www.zendesk.com/blog/step-by-step-guide-to-integrating-zendesk-and-salesforce/
Share on: